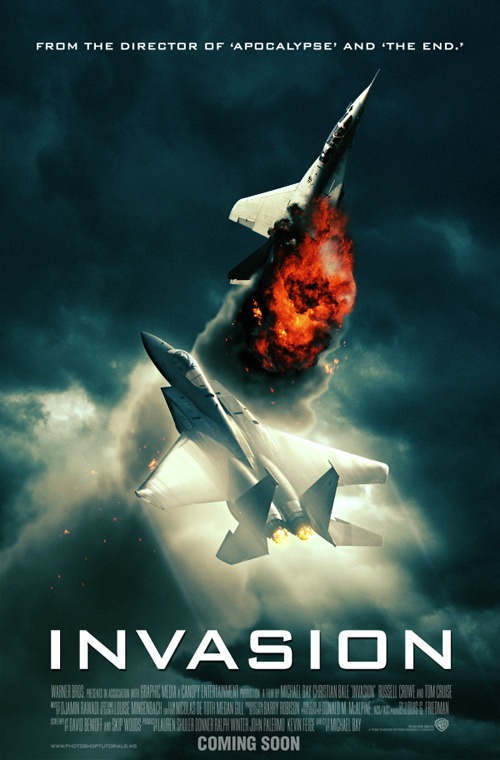
In this tutorial I'll show you how I created my Invasion movie poster in Photoshop. For quite some time now I wanted to create an action-movie poster tutorial and I thought this would be the best time to do so. It is a lengthy tutorial and I have worked a few days on this tutorial so I really hope some of you find it useful! Continue reading to see the final image and learn how you can create a movie poster from just a few images!
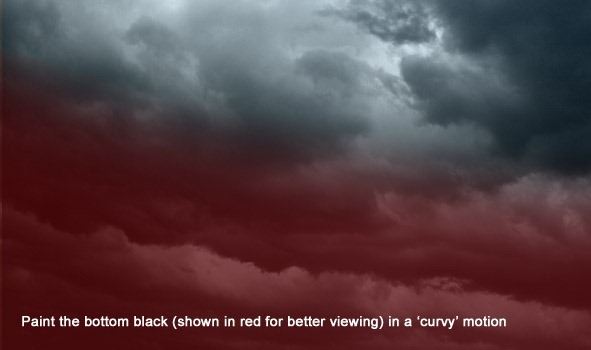
 Create a new layer and name it 'Billing_Block_Shadow'. Grab a Soft Round Brush of any size and start painting the bottom of the image black. Set the Opacity to 50%.
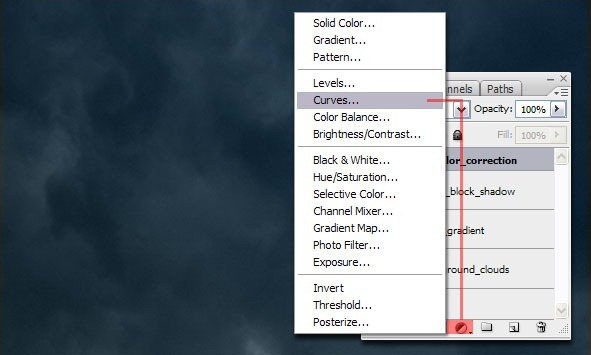
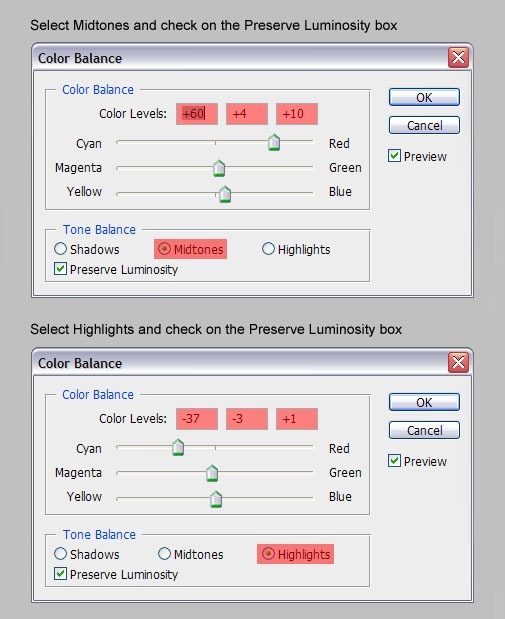
 Add a Color Balance Adjustment Layer by clicking on the, as I'd like to call it 'Yin-Yang' button in the Layer Menu. By default, the Color Balance menu will open in the Midtones Channel. Set the Cyan color level to +60, Magenta to +4 and the Yellow Channel to +10. Go to the Highlights Channel and set the first level to -37, set the second channel to -3 and the third channel to +1. Drag this Adjustment Layer underneath the Curves Adjustment layer.
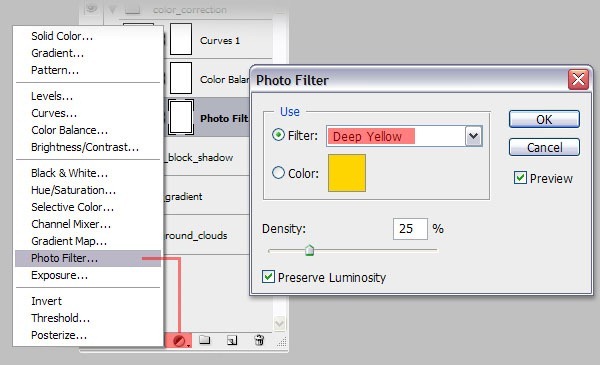
 Add a Photo Filter Adjustment Layer and select the Deep Yellow preset. Keep the Density at 25% and check on Preserve Luminosity. Drag this Photo Filter Adjustment layer underneath the Color Balance Adjustment layer.
 This next layer will be our noise layer which will help blend all of the images together. Create a new layer, name it 'Adjustment_01' and fill it with a grayish-black (#222222) and set the Layer Mode to Screen. Go to Filter>Noise>Add Noise, set the Amount to 7%, set theDistribution to Gaussian and check on Monochromatic. Create another layer, name it 'Adjustment_02' and fill it with a bright blue-ish color(#17d7ff), set the Layer Mode to Color and the Opacity to 15%. At this point of the tutorial, you should have a result similar to the image below and your layers should be kept as shown below.
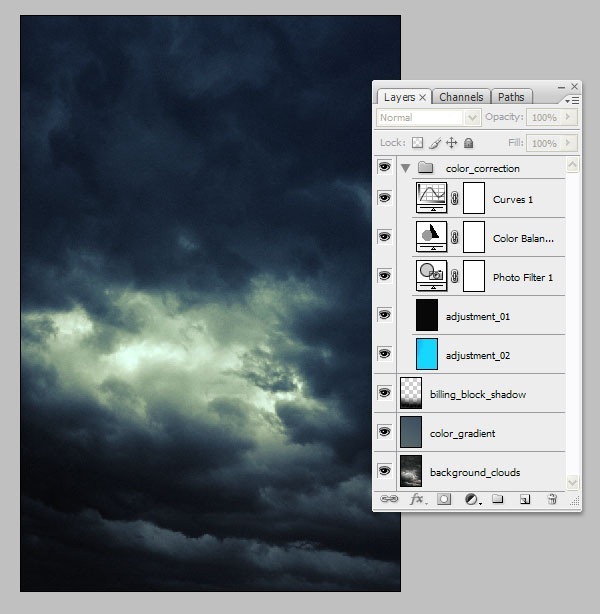 PLEASE NOTE! From this point on, everything we are going to be working on needs to be placed below the color correction group.
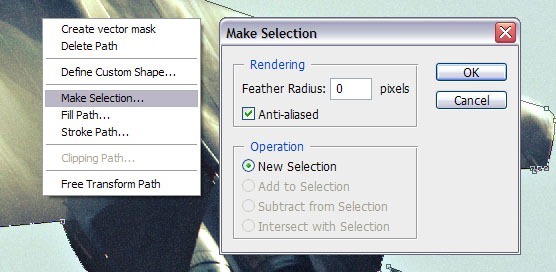
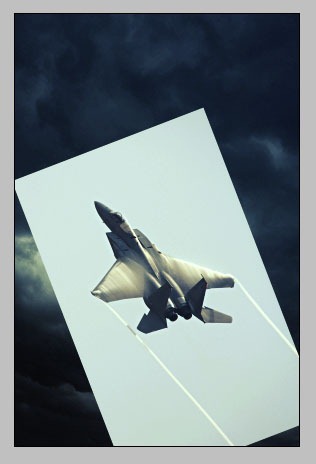 Because the aircraft has lots of curves and sharp corners, the best and fastest way to get rid of the sky is by using the Pen Tool (P). Try to get every detail of the aircraft including the smallest metal parts, it will look more realistic in your final design. When you're done creating a path around the aircraft, right-click within the path and click on Make Selection..., click OK.
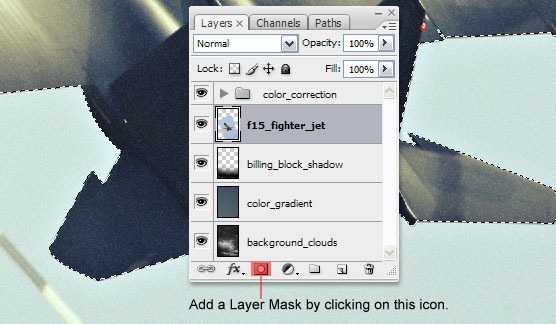
 Once the path is turned into a selection, click on the Mask icon at the bottom of the Layer menu and you'll see that the entire background is gone.
 Repeat this step with the image of the MiG-22 Fighter Jet and place the image as shown below. Make sure you flip the image horizontally! For better organizing, create two new groups with the names of the aircraft layers and put the images in the corresponding groups.
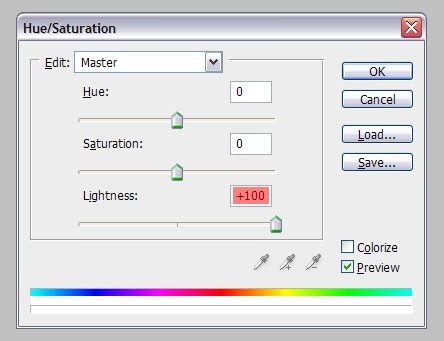
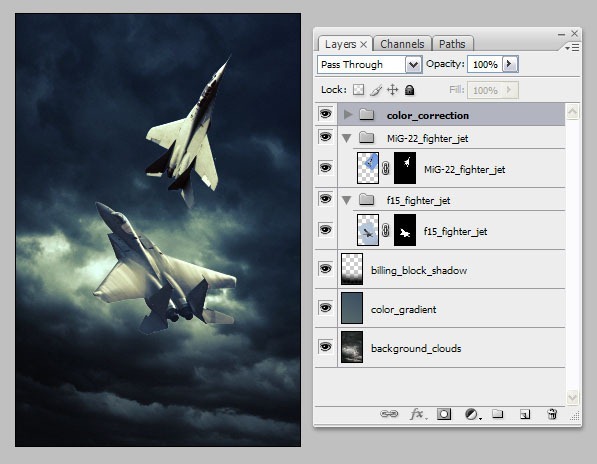 Back to the F15 Fighter Jet. Because I want to add some vapor trails we'll need to create a copy of the masked layer, place it below the F15 and press Ctrl + U to bring up the Hue/Saturation menu. Set the Lightness to +100 and click OK.
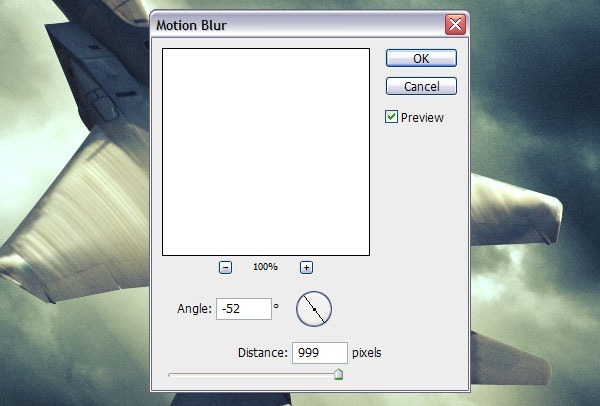
 Go to Filter>Blur>Motion Blur, set the Angle to -52 and set the Distance to 999.
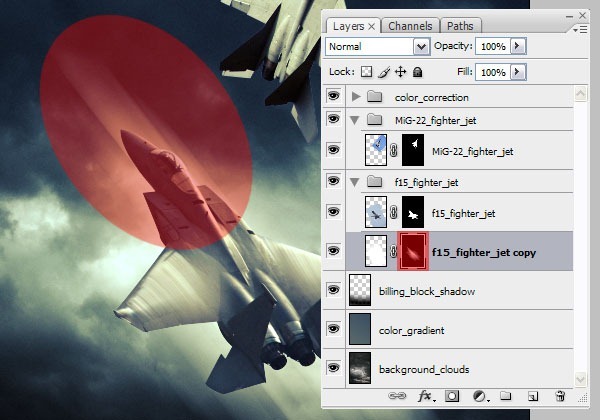
 We'll need to remove the white motion blur in front of the aircraft. You can do this by clicking on the layer mask thumbnail, set the Foreground color to black and select a Soft Round brush of around 500px. Now paint away the white area in front of the aircraft.
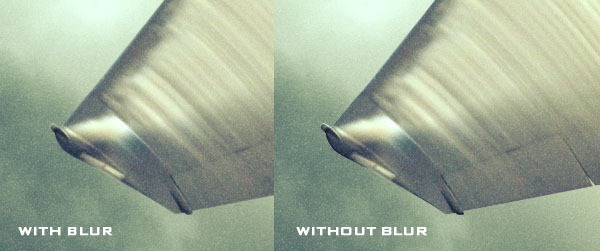
 You can now rename this layer to 'Vapor_trails'. The lines in this layer are too strong so I'm going to add a Gaussian Blur so it will soften up a bit. Select the layer thumbnail and go to Filter>Blur>Gaussian Blur and set the Radius to 15.
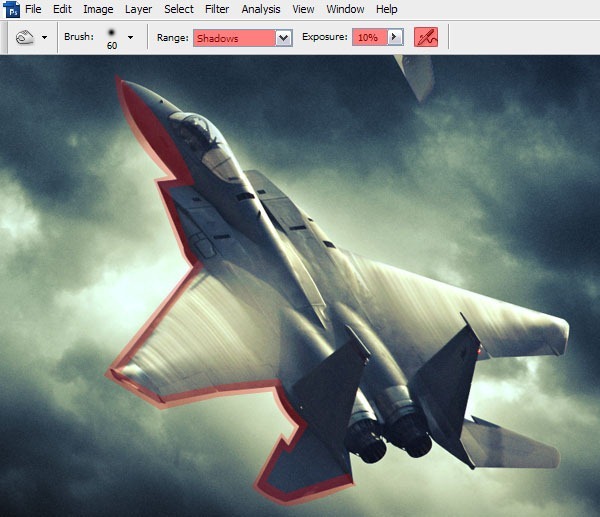
 Next, select the Burn tool (O) and set the Brush Mode to Shadows, set the Exposure to 10% and check the 'Set to enable airbrush capabilities' box on. By using these settings you can create a subtle difference when using the Burn tool. You need to 'burn' the shadows on the left part of the fighter jet image.
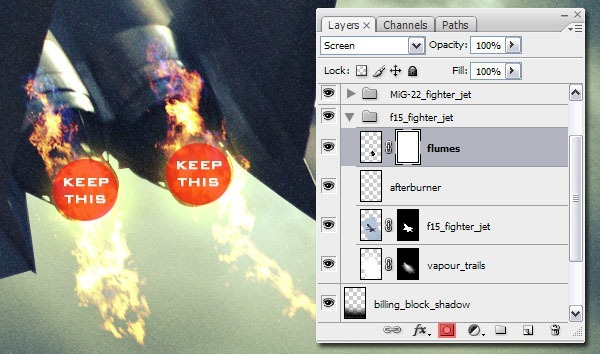
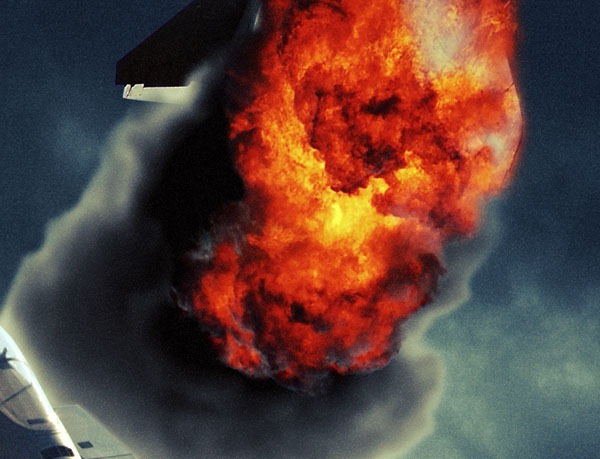
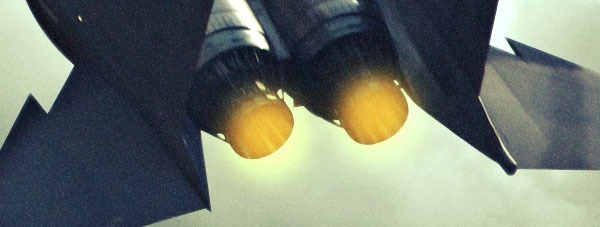 Download the 'Fire Flumes' image and open it up in Photoshop. Pick the first and fifth flume and cut them from the original stock photograph. Drag these on top of the 'Afterburn' layer and set the Layer Mode to Screen. You can rotate and scale these as much as you want or place them exactly like the image below.
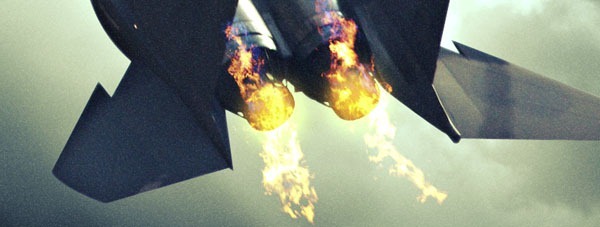 With the 'Flumes' layer selected, click on 'Add Layer Mask' in the bottom of the Layer menu. This way we can easily undo any mistakes that are created on the flumes layer. Grab a black Soft Round brush of 50px and start masking everything away that's outside of the jet engines.
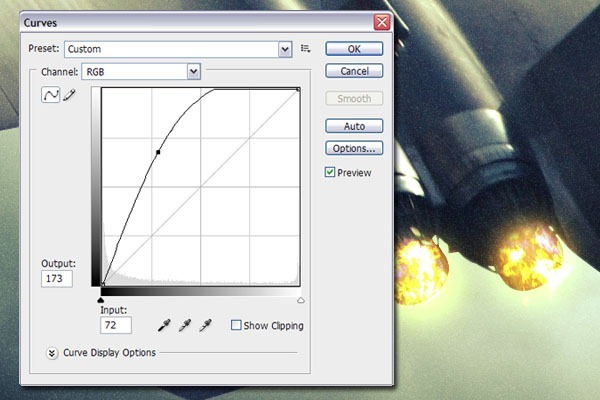
 To intensify the heat of the flumes, go to Image>Adjustments>Curves and put the settings exactly as shown below.
 You can mask away any white areas you don't like or think it looks too much. For the right wing you should create another copy of this layer, press Ctrl + T and right-click within the image and click on 'Flip Horizontal'. Rename this layer to 'Vapor_trail_right_wing'. Rotate and place this layer on the right wing as you would like. Because we've put this layer on top of the aircraft the lower part of the plane still looks flat. We can fix this by making the upper tail wings looking less 2D, create a path around the left upper tail wing, right-click and click on 'Make Selection...' and click OK.
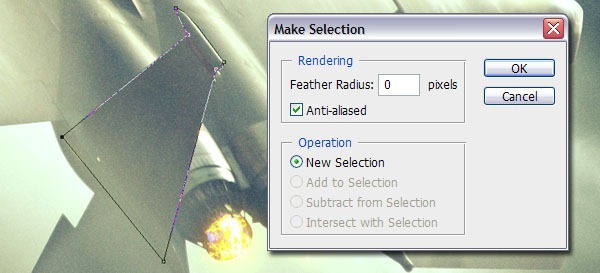 With the Layer Mask selected of the 'Vapor_trail_left_wing' layer, pick a large Soft Round brush and gently start masking away the top of the vapor trail on the top of the tail wing. Do the exact same thing for the right tail wing. The difference is subtle but noticeable.
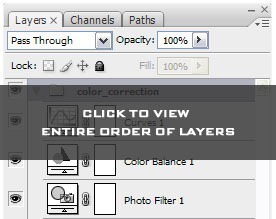
 We are done for now with the F15 fighter jet so let's move on to the Russian MiG-29. For the next step you should drag the MiG-29 folder below the F-15 folder. If you have followed this tutorial step by step, your order of layers should be exactly like the image below. Click on the image to view the entire order of layers.
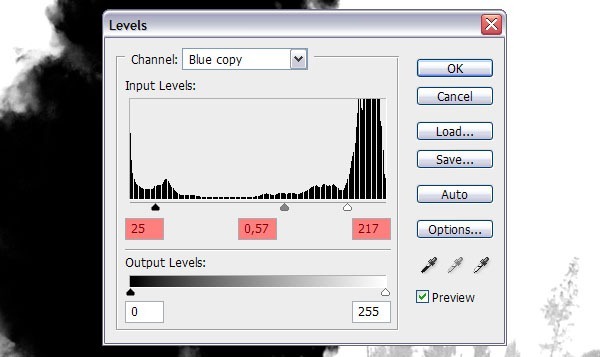
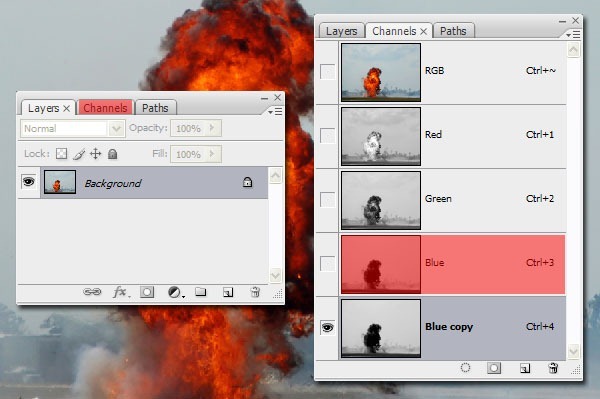 Go to Image>Adjustments>Auto Levels. By clicking on Auto Levels you can see that this helps us tremendously as we need to separate the black from the white but there is still quite a bit left to be masked. Go to Image>Adjustments>Levels and the Levels menu will pop up. Enter the settings as shown in the image below.
 Paint this over with a white color in Normal Brush Mode. Now that the explosion is as good as being separated we can start working on the explosion. Grab a Soft Round brush of any size, set your foreground color to black and set the Brush Mode to Overlay. By setting the mode to Overlay we won't be able to mask away the black color but we can darken or paint away the white and grey colors. Gently start painting outwards of the explosion, the final outcome will profit from this. Make sure you switch from the RGB channel to the corresponding channels to see what's actually part of the explosion and what isn't.
To remove white or grey areas, simply switch your foreground color to white. When you're done painting on the layer mask, click on the RGB channel and head back to the Layers menu. Go to Select>Load Selection... and switch the Channel to the Blue copy Channel, make sure you check the 'Invert' box.
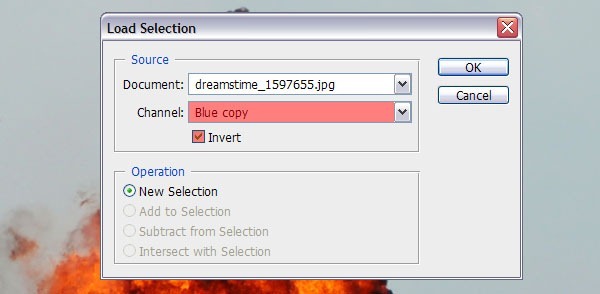 When you've done this, you will notice that the mask you have just created will be turned into a selection. Click on the Add Layer Maskicon and voila! A masked explosion has been created.
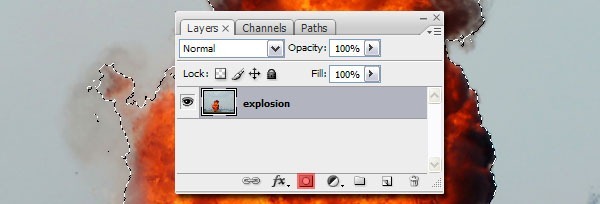 Now that this Layer Mask is done, drag it over to our poster canvas on top of the MiG-29 layer. Try to scale and rotate the explosion as shown below.
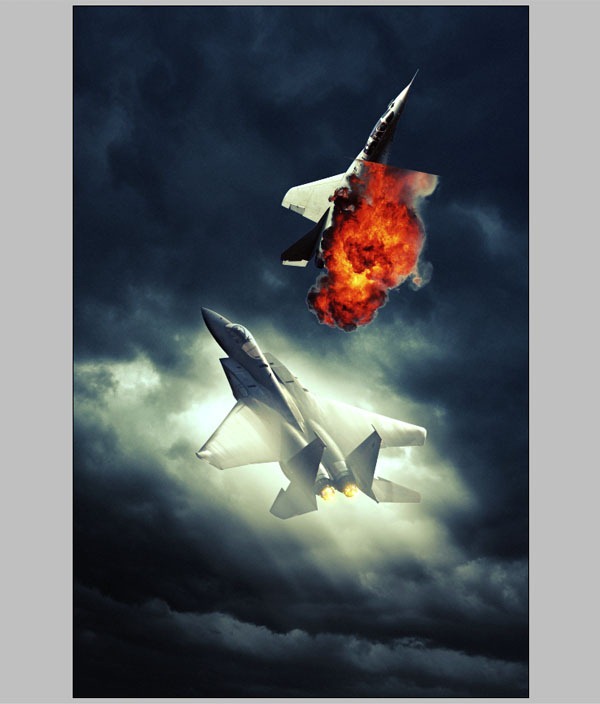 In the image below you can see I didn't do a really good job masking the explosion but we can fix this. By clicking on the Layer Mask thumbnail, we can still edit the mask by using black and white colors. It still doesn't have to be perfect as we're going to apply color correction later.
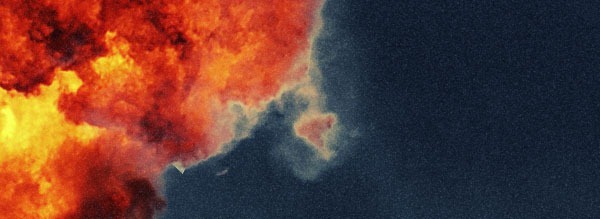
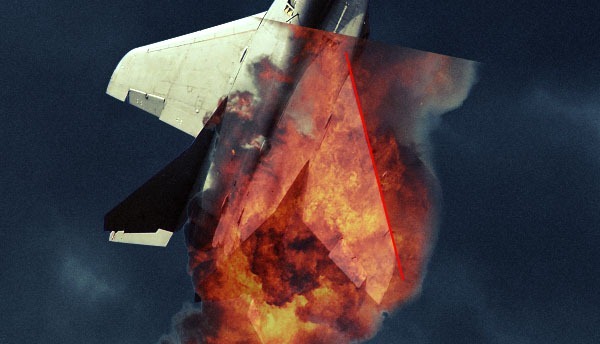 Because of the explosion, I want the aircraft look like it is about to stall and crash down back to earth. This is why the fire (and later smoke trail) looks like it is burning on the wing rather than a fire trail. Grab a large Soft Round brush and start masking away the areas on top of the wing. Do this very gently!
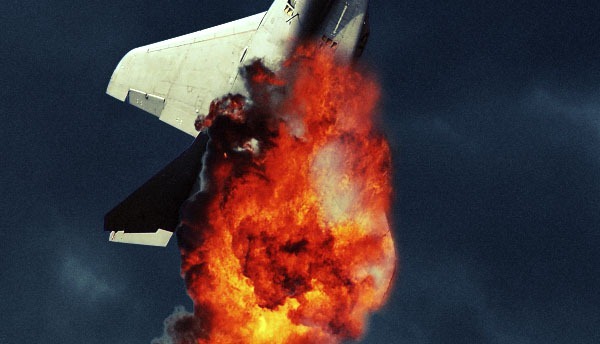
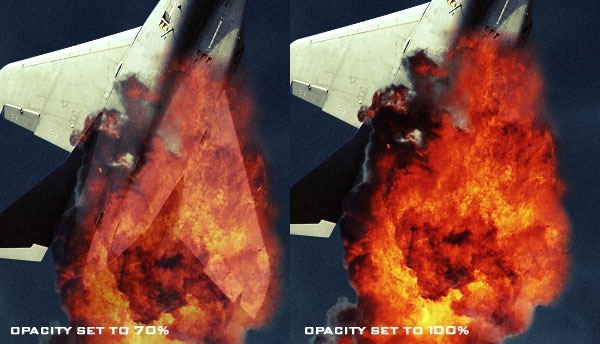 We need to show a large piece of the wing to show through the fire so create a rough path around the right wing using the Pen tool (P), make a selection and create a copy. Drag this copy above the explosion layer. As mentioned before, masking is all about subtlety and you need to do this with patience! By creating a copy the wing got 'cut' from the other Layer Mask so you will need to add a new Layer Mask to the copy. In this case you can vary between brush sizes and brush opacity as we need to make it look as realistic as possible. This is my result:
 Download the 'Smoke Cloud' image and open it up in Photoshop. We need to mask this exactly like the explosion image. If you're experiencing any trouble, try adjusting the settings yourself. Once you're done masking, drag it into our poster document and drag it under the explosion layer but on top of the aircraft layer. Resize and rotate the cloud as shown below.
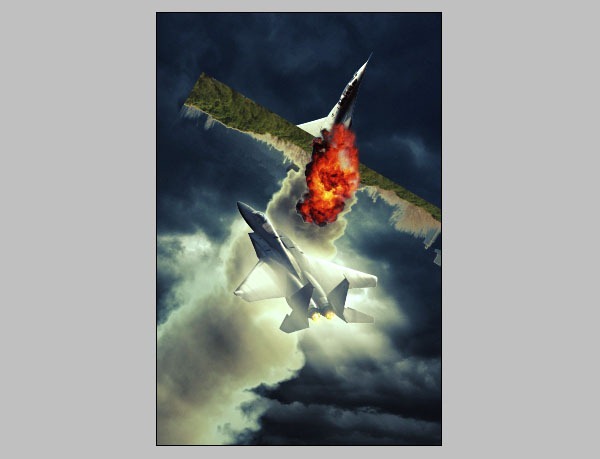 The cloud still has some spill left from the masking but we can hide this by simply desaturating it. Press Ctrl + U to bring up theHue/Saturation menu and set the Saturation to -100. Click on the Layer Mask thumbnail and remove any leftover spill. Grab the Burn Tool (O) and set the Range to Shadows and the Exposure to 35%. With the Burn tool you can darken up the smoke cloud, this is especially handy to blend the explosion with the smoke cloud. Switch between those layers to blend them perfectly.
 Personally I think the overall poster colors look a bit bland so I'm going to add a new Curves Adjustment layer with the following settings. Try to place these as shown below.
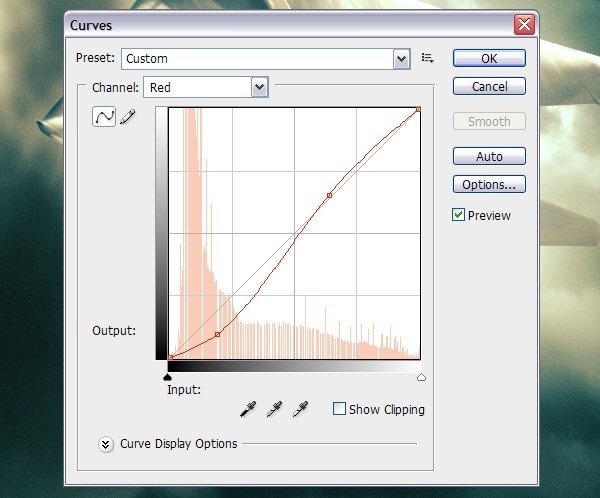
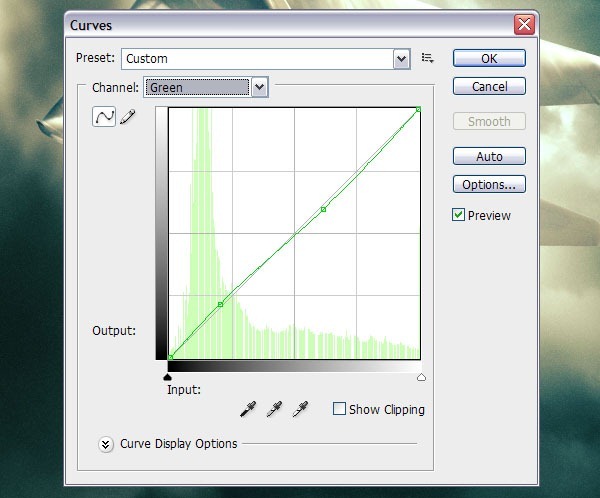
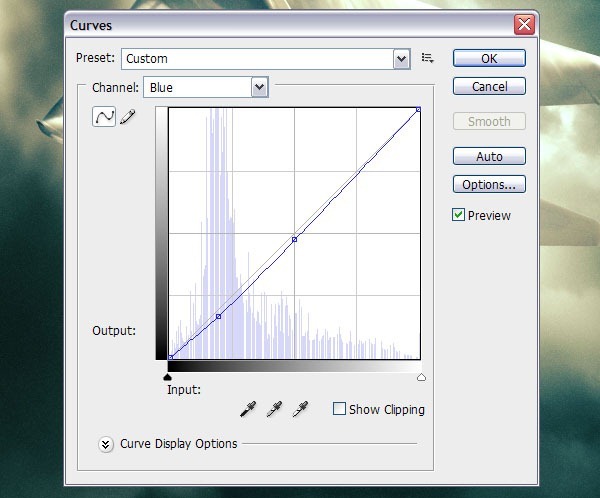 When you've followed my instructions, you should have something like this.
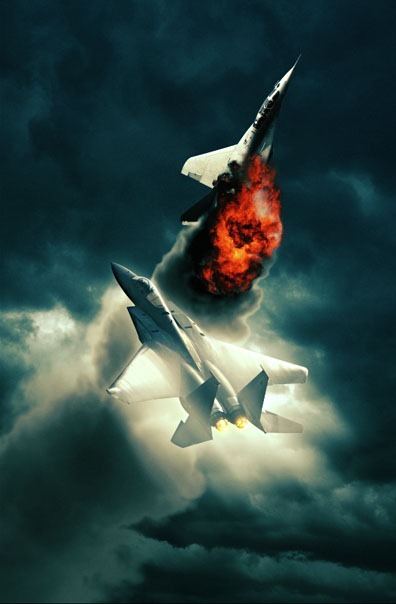 At this point the poster is almost finished but still needs some tweaking. I'm missing sparks, vapor trails and text. Later this week I will publish a tutorial on how to create the typical billing block in Photoshop but let's focus on finishing this image.
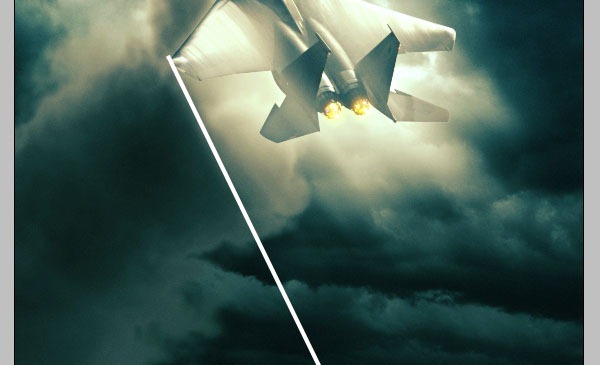 Go to Filter>Blur>Motion Blur, set the Angle at -67 and the Distance at 463.
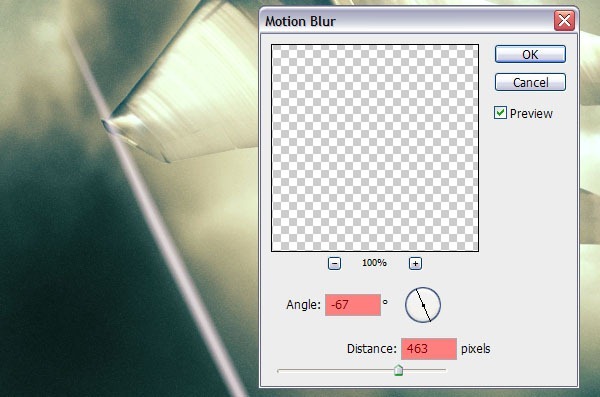 Set the Layer Mode to Overlay and the Opacity to 30%. Remove the leftover part on top of the wing. Once you're done with this, create a copy and drag it to the other wing.

![invasion_final_poster[1] invasion_final_poster[1]](http://photoshoptutorials.ws/images/stories/a89f15bdf885_13947/invasion_final_poster1.jpg)
“Invasion” Movie Poster Photoshop Tutorial
Resources
Final Image

Step 1
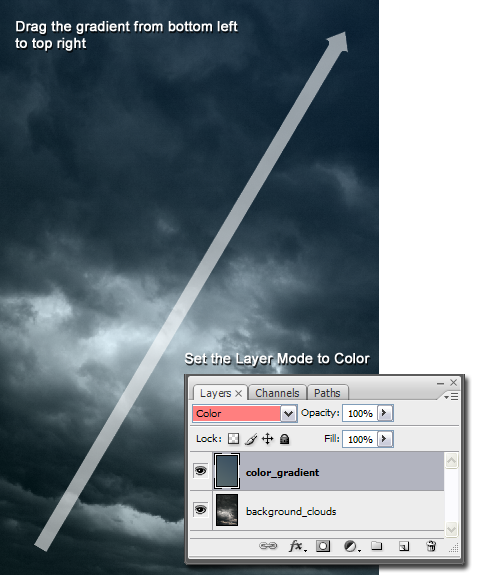
Open up Photoshop and create a new Document of 2270x3450 and click OK. Open the Cloud image and scale it down (Ctrl + T) so that it fits the canvas. Create a new layer and name it 'Color_Gradient' and set the Layer Mode to Color. Select the Gradient Tool (G) and set a grey-ish green color (#58686b) as the foreground color and a marine blue color (#394f61) as the background color. Drag the Gradient Tool (G) from the bottom left to the top right.

Step 2
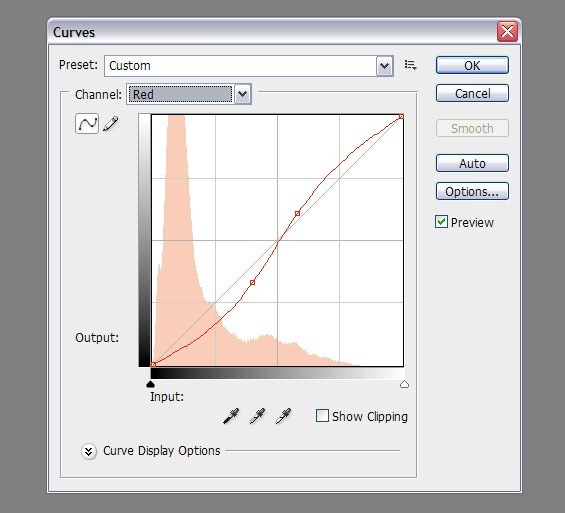
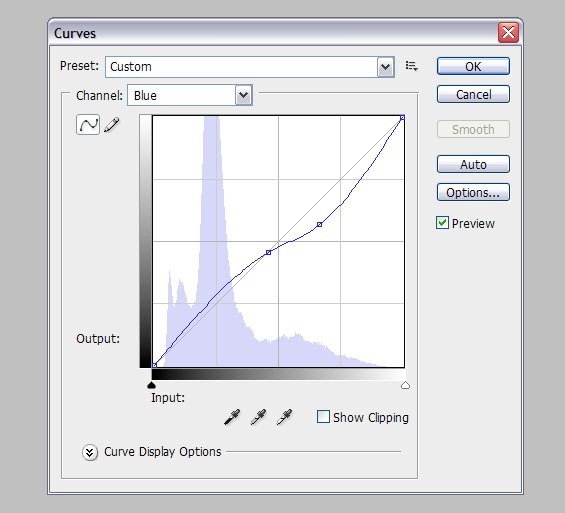
Now we are going to add a whole bunch of color correction layers. Create a new Group and name it 'Color_Correction', add a new Curves Adjustment Layer and go to the Red and Blue Channel and try to simulate the settings shown below. Leave the Green Channeluntouched.


Step 3
Download the image of the F-15 Fighter Jet, open it up in Photoshop and drag it into our composition. Scale and rotate the image just like the image shown below.


Step 4
To blend the aircraft with the background even better is by using the Blur, Dodge and Burn tools.- Blur tool (R): By using this tool you can blur sharp edges such as the wings of the aircraft which will make it look even more realistic.
- Dodge tool (O): For highlighting the brighter areas of the aircraft, it is best to use the Dodge tool.
- Burn tool (O): You can use this tool for darkening areas that you want to hide or to create shadows.


Step 5
Create a new layer and name it 'Afterburner' and drag this empty layer on top of the left fighter jet image. Grab a Soft Round brush of100px, go to the color palette and select an orange color (#fe8900). Click twice on each jet engine to give it a nice glow and set the Layer Mode to Linear Dodge (Add).


Step 6
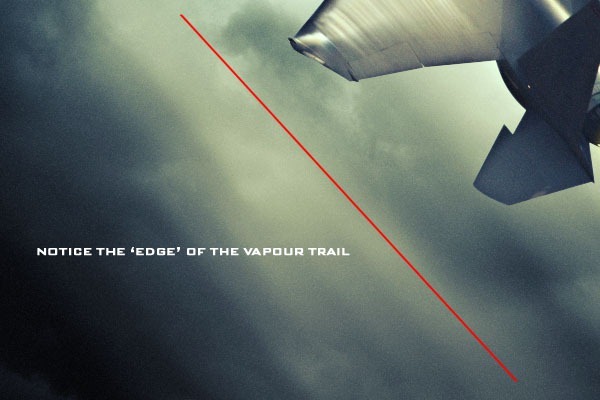
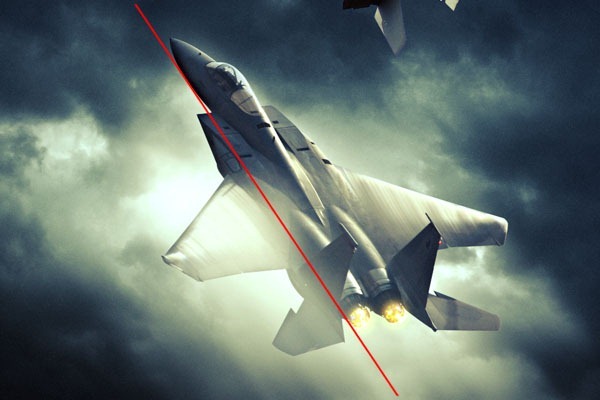
I'm still not entirely happy with the aircraft as it looks like it is rather flat. So what we're going to do is adding new vapor trails but on top of the wings. You can simply copy the 'Vapor_trail' layer we did earlier, drag it on top of the flumes and set the Opacity to 60%. For organizing purposes, you should rename this layer to 'Vapor_trail_left_wing'. When moving this layer around by using the Move tool (V), you'll see that the layer has a sharp edge. We can use this to align it with the wing, have a look at the images below.


Step 7
Download the 'Explosion' image and open it up in Photoshop. What we're going to do now is masking the explosion from the background. Go to Channels and select the channel with the highest contrast which in this case is the Blue channel. Right-click on the Blue channel and create a copy, make sure you are working on the copied layer otherwise the masking won't work properly!

To remove white or grey areas, simply switch your foreground color to white. When you're done painting on the layer mask, click on the RGB channel and head back to the Layers menu. Go to Select>Load Selection... and switch the Channel to the Blue copy Channel, make sure you check the 'Invert' box.


Step 8
We're going to start working on the burning wing but first, you need to set the Opacity to 70%. This will help us to see what exactly what we're going to be editing, have a look below to see how you should place the explosion.


Step 9
We're finally ready for some color correction. Let's start of by selecting the Explosion layer, go to Image>Adjustments>Color Balance. Set Brightness to -55 and Contrast to +25.


Step 10
Create a long and narrow white rectangle and rotate it so that it lines up with the angle of the F15 wings.

Step 11
Open the Flumes image, drag it into our composition and set the Layer Mode to Screen. Focus on the smaller sparks surrounding the flumes, these will be used for the explosion. Create a selection around the sparks you want to move over to the explosion. Use the Move tool to drag them over to the explosion, place and rotate them anywhere you want.
Final
![invasion_final_poster[1] invasion_final_poster[1]](http://photoshoptutorials.ws/images/stories/a89f15bdf885_13947/invasion_final_poster1.jpg)


Post a Comment